Showing posts with label brick stitch beading. Show all posts

Basic Brick Stitch Single Bead Technique Tutorial for Brick Stitch Bead Weaving

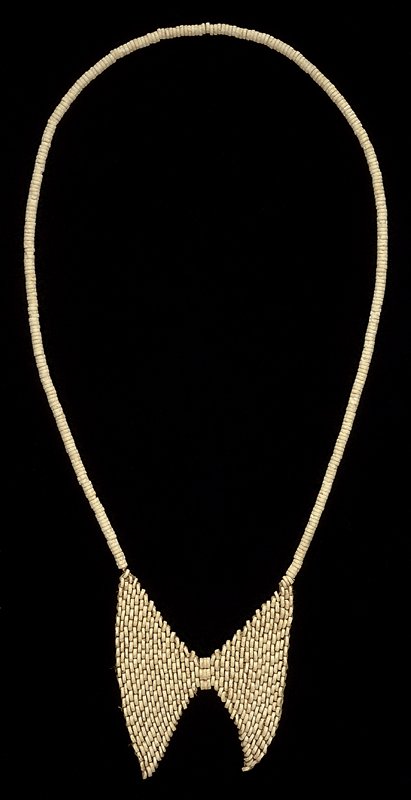
Basic Brick Stitch Technique For Brick Stitch Beading


How to bead basic brick stitch seed bead weaving technique tutorial.  Brick stitch gets its' name from the offset beads that look like a brick wall.  It creates more stiff beadwork and is ideal for earrings, broaches, and pendants.  In this tutorial, you will learn how to bead a basic brick stitch with a single bead technique.  This beading technique can be done with just about any type and size of seed bead.  Tube shaped beads, annular shaped beads, barrel beads, cylinder shaped beads, crow beads, pony beads, and cube beads work well with the back stitch.

Support this blog and buy me a coffee at 

You can watch the following video or scroll down to see the individual slides of how to create a Two Row or Peyote Start base row for brick stitch beading with the single bead technique.

Watch the tutorial video:

You can view this video tutorial on YouTube here:

View the individual steps:

Click the image to view the Basic Brick Stitch Technique beading tutorial image larger.
Basic Brick Stitch Single Bead Brick Stitch Bead Weaving Tutorial
This Basic Brick Stitch Single Bead technique tutorial is part of an educational video series on brick stitch beading techniques.  Scroll down to view each step.  Click on the images to view them larger.

Step 1:  Complete your base row using the Ladder Stitch or Back Stitch Technique.
Click the image to view the Basic Brick Stitch Technique beading tutorial image larger.
Basic Brick Stitch Single Bead Brick Stitch Bead Weaving Tutorial Step 1

Step 2:  String the first two beads of your first brick stitch row.
Click the image to view the Basic Brick Stitch Technique beading tutorial image larger.
Basic Brick Stitch Single Bead Brick Stitch Bead Weaving Tutorial Step 2

Step 3:  Thread the needle under the first thread bridge of your base row and pull the thread taught.
Click the image to view the Basic Brick Stitch Technique beading tutorial image larger.
Basic Brick Stitch Single Bead Brick Stitch Bead Weaving Tutorial Step 3

Step 4:  Thread the needle up through the second bead of your first brick stitch row and pull the thread taught.
Click the image to view the Basic Brick Stitch Technique beading tutorial image larger.
Basic Brick Stitch Single Bead Brick Stitch Bead Weaving Tutorial Step 4

Step 5:  String the next bead of your first brick stitch row.
Click the image to view the Basic Brick Stitch Technique beading tutorial image larger.
Basic Brick Stitch Single Bead Brick Stitch Bead Weaving Tutorial Step 5

Step 6:  Thread the needle under the next thread bridge of your base row and pull the thread taught.
Click the image to view the Basic Brick Stitch Technique beading tutorial image larger.
Basic Brick Stitch Single Bead Brick Stitch Bead Weaving Tutorial Step 6

Step 7:  Thread the needle up through the bead you just added and pull the thread taught.
Click the image to view the Basic Brick Stitch Technique beading tutorial image larger.
Basic Brick Stitch Single Bead Brick Stitch Bead Weaving Tutorial Step 7

Step 8:  String the next bead of your second brick stitch row.
Click the image to view the Basic Brick Stitch Technique beading tutorial image larger.
Basic Brick Stitch Single Bead Brick Stitch Bead Weaving Tutorial Step 8

Step 9:  Thread the needle under the next thread bridge of your base row and pull the thread taught.
Click the image to view the Basic Brick Stitch Technique beading tutorial image larger.
Basic Brick Stitch Single Bead Brick Stitch Bead Weaving Tutorial Step 9

Step 10:  Thread the needle up through the bead you just added and pull the thread taught.
Click the image to view the Basic Brick Stitch Technique beading tutorial image larger.
Basic Brick Stitch Single Bead Brick Stitch Bead Weaving Tutorial Step 10

Step 11:  String the next bead of your second brick stitch row.
Click the image to view the Basic Brick Stitch Technique beading tutorial image larger.
Basic Brick Stitch Single Bead Brick Stitch Bead Weaving Tutorial Step 11

Step 12:  Thread the needle under the next thread bridge of your base row and pull the thread taught.
Click the image to view the Basic Brick Stitch Technique beading tutorial image larger.
Basic Brick Stitch Single Bead Brick Stitch Bead Weaving Tutorial Step 12

Step 13:  Thread the needle up through the bead you just added and pull the thread taught.  If you have more beads to add to this row, repeat from step 11.
Click the image to view the Basic Brick Stitch Technique beading tutorial image larger.
Basic Brick Stitch Single Bead Brick Stitch Bead Weaving Tutorial Step 13

Step 14:  String the first two beads of your second brick stitch row.
Click the image to view the Basic Brick Stitch Technique beading tutorial image larger.
Basic Brick Stitch Single Bead Brick Stitch Bead Weaving Tutorial Step 14

Step 15:  Thread the needle under the first thread bridge of the row beneath and pull the thread taught.
Click the image to view the Basic Brick Stitch Technique beading tutorial image larger.
Basic Brick Stitch Single Bead Brick Stitch Bead Weaving Tutorial Step 15

Step 16:  Thread the needle up through the second bead of the two beads you just added and pull the thread taught.
Click the image to view the Basic Brick Stitch Technique beading tutorial image larger.
Basic Brick Stitch Single Bead Brick Stitch Bead Weaving Tutorial Step 16

Step 17:  String the next bead of your brick stitch row.
Click the image to view the Basic Brick Stitch Technique beading tutorial image larger.
Basic Brick Stitch Single Bead Brick Stitch Bead Weaving Tutorial Step 17

Step 18:  Thread the needle under the next thread bridge of the row below and pull the thread taught.
Click the image to view the Basic Brick Stitch Technique beading tutorial image larger.
Basic Brick Stitch Single Bead Brick Stitch Bead Weaving Tutorial Step 18

Step 19:  Thread the needle back up through the bead you just added and pull the thread taught.
Click the image to view the Basic Brick Stitch Technique beading tutorial image larger.
Basic Brick Stitch Single Bead Brick Stitch Bead Weaving Tutorial Step 19

Step 20:  String the next bead of your brick stitch row.
Click the image to view the Basic Brick Stitch Technique beading tutorial image larger.
Basic Brick Stitch Single Bead Brick Stitch Bead Weaving Tutorial Step 20

Step 21:  Thread the needle under the next thread bridge of the row below and pull the thread taught.
Click the image to view the Basic Brick Stitch Technique beading tutorial image larger.
Basic Brick Stitch Single Bead Brick Stitch Bead Weaving Tutorial Step 21

Step 22:  Thread the needle up through the bead you just added and pull the thread taught.
Click the image to view the Basic Brick Stitch Technique beading tutorial image larger.
Basic Brick Stitch Single Bead Brick Stitch Bead Weaving Tutorial Step 22

Step 23:  String the next bead of your brick stitch row.
Click the image to view the Basic Brick Stitch Technique beading tutorial image larger.
Basic Brick Stitch Single Bead Brick Stitch Bead Weaving Tutorial Step 23


Step 24:  Thread the needle under the next thread bridge of the row below and pull the thread taught.
Click the image to view the Basic Brick Stitch Technique beading tutorial image larger.
Basic Brick Stitch Single Bead Brick Stitch Bead Weaving Tutorial Step 24

Step 25:  Thread the needle up through the bead you just added and pull the thread taught.  If you have more beads to add to this row, repeat from step 23.
Click the image to view the Basic Brick Stitch Technique beading tutorial image larger.
Basic Brick Stitch Single Bead Brick Stitch Bead Weaving Tutorial Step 25

Step 26:  If you have more rows to add to your brick stitch, repeat from step 2.
Click the image to view the Basic Brick Stitch Technique beading tutorial image larger.
Basic Brick Stitch Single Bead Brick Stitch Bead Weaving Tutorial Step 26

What IF?  If the thread and needle of your base row exit the bottom of your base row instead of the top...
Click the image to view the Basic Brick Stitch Technique beading tutorial image larger.
Basic Brick Stitch Single Bead Brick Stitch Bead Weaving Tutorial Step What If?

What IF?  Simply flip your base row over so the thread exits the top of the beads.
Click the image to view the Basic Brick Stitch Technique beading tutorial image larger.
Basic Brick Stitch Single Bead Brick Stitch Bead Weaving Tutorial Step What If?


Follow Brick Stitch Bead Patterns Journal on Social Media:

How To Ladder Stitch

In this lesson, you will learn how to ladder stitch a basic beaded base row for brick stitch bead work.

Support this blog and buy me a coffee at 

102:  Simple Ladder Stitch

Free beading tutorial for the ladder stitch
A simple ladder stitch base row for brick stitch beading.


You can download a printable pdf of this lesson by clicking the link below:

You can view the images below larger by clicking on them, then download them by right clicking and selecting save.  Scroll to the bottom of this page to view a video presentation of these slides.

The ladder stitch is the most common stitch used to build a base row, or the first row, of brick stitch bead work.  It is also used to increase brick stitch rows by more than one bead.  Knowing how to ladder stitch is vital to brick stitch beading, especially with advanced pattern work.

Brick stitch beading online lesson tutorial.
String the first two beads of the base row.

Brick stitch beading online lesson tutorial.
Leaving a 6-8 inch tail of string,
hold both beads side by side so that a loop of string forms above them.

Brick stitch beading online lesson tutorial.
While holding the two beads in place,
send the needle up through the first bead.

Brick stitch beading online lesson tutorial.
Pull the thread taught, but not tight.  Do not pull so tightly on the thread
as to cause tension in it.  The two beads are now held together
by a small loop.

Brick stitch beading online lesson tutorial.
Continue holding the two beads in place.  Run the needle down through the
second bead.

Brick stitch beading online lesson tutorial.
Continue holding the two beads in place.  Run the needle up through
the first bead.

Brick stitch beading online lesson tutorial.
Continue holding the two bead in place and pull the thread taught.
Then, run the needle down through the second bead.

Brick stitch beading online lesson tutorial.
Continue holding the two beads in place and pull the thread taught.
String the next bead onto the needle.

Brick stitch beading online lesson tutorial.
Continue holding the first two beads in place.  Position the third bead
next to the second bead so that a loop forms below the two beads
and hold it in place.  Run the needle down through the second bead.

Brick stitch beading online lesson tutorial.
Continue holding the three beads in place and pull the thread taught.

Brick stitch beading online lesson tutorial.
Continue holding the three beads in place.  Run the needle up through the third bead.

Brick stitch beading online lesson tutorial.
Continue holding the three beads in place and pull the thread taught.
String the fourth bead.

Brick stitch beading online lesson tutorial.
Continue holding the three beads in place.  Place the fourth bead next to the
third bead so that a loop forms above them in the thread.  Hold all four beads
in place while running the needle up through the third bead.

Brick stitch beading online lesson tutorial.
Continue holding the four beads in place and pull the thread taught.  Then,
run the needle down through the fourth bead.

Brick stitch beading online lesson tutorial.
Continue holding the four beads in place.  Pull the thread taught.

Brick stitch beading online lesson tutorial.
Thread the fifth bead and repeat steps nine through 15 until you have reached
the desired number of beads for the base row.

Here is a video presentation of this lesson:


You can view this video on YouTube by following this link:


Learn how to brick stitch with Brick Stitch Beading University by Brick Stitch Bead Patterns Journal where all lessons and tutorials are free!

Support this blog and buy me a coffee at 


Follow Brick Stitch Bead Patterns Journal on Social Media:


What Is Brick Stitch Beading?

So, what is Brick Stitch Beading?

Brick Stitch Beading is an off-loom technique where the beads are arranged to look like a brick wall, with the beads connected by loops of thread.  They are stacked, horizontally, either above or below a Foundation Row, also called a Base Row.

Illustrative comparison of a brick wall and brick stitch.
Brick Wall VS. Brick Stitch


The Brick Stitch style of beadwork has been around for centuries.  No one really knows for sure where and when it originated.  It is closely related to the Peyote and Gourd stitches; but is more challenging to learn.  However, Brick Stitch is just as versatile, if not more so, than the Peyote and Gourd.  The results of the more stiff, firmer finish work of Brick Stitch makes it ideal for 3-D and shaped patterns.  Brick Stitch can be worked from Left to Right, Right to Left, Top to Bottom, Bottom to Top, Increased, Decreased, Skipped, Stacked, Layered, Worked in the Round, Worked in Tube, and when combined with the popular Foundation Row stitch, called the Ladder Stitch, can become nearly any shape imaginable.


Native American woman teaching daughter to bead.
Brick Stitch was popularized in the U.S.A. by the beautiful Native American Plains Indians’ beadwork.  Brick Stitch is also known a the Cheyenne Stitch and the Comanche Stitch due to
their noted use of this technique. Though the Brick Stitch style is largely associated with Native American beadwork, they were not the creators of this beading stitch.  There is seemingly little evidence that the Great Plains tribes used the Brick Stitch technique before pioneering tradesmen introduced European glass beads to them.  Their beadwork previous to the explorations of Columbus primarily consisted of shells, seeds, bones, and rocks.


African brick stitch beadwork neck ornament.
Arts of Africa collection
Gift of Mrs. Herman Eggers
Attribution: Brooklyn Museum
Brick Stitch was also used in South America, the Middle East, and in Africa.  It is in Africa
where we can find the most prolific and very creative use of this technique.  The Zulu women embraced the Brick Stitch style of beading, using it to create their own visual language through beadwork.  Their structurally intricate beaded jewelry conveys social rank, stages of courtship, where they live, and much more.


San Eggshell Brick Stitch Necklace
From:
The David Draper Dayton Fund
The San of the Kalahari Desert in Africa, also know as the Bushmen, may have used the Brick Stitch technique far earlier than the Zulu, though.  Early beadwork of the San was created with handmade ostrich eggshell beads and the Brick Stitch technique.  When trade beads were introduced, they simply transferred their skills with Brick Stitch from the ostrich eggshell beads to the newly available
glass beads. 
The Brick Stitch technique probably flowed out of Africa as the bead trade grew, into the Middle East, then carried to the Native Americans of both North and South America through trade expansion.


Learn how to brick stitch with Brick Stitch Beading University by Brick Stitch Bead Patterns Journal where all lessons and tutorials are free!


Support this blog and buy me a coffee at 

Follow Brick Stitch Bead Patterns Journal on Social Media:


Popular Posts