Showing posts with label single bead. Show all posts

Back Stitch Base Row Single Bead Technique Tutorial

Base Row Technique For Brick Stitch Beading


Brick stitch must have a foundation to build from.  There are several ways to create a base row, also known as a foundation row, with beads.  In this tutorial, you will see how to create a Back Stitch Base Row with a single bead technique to create the first row of your bead pattern.  The beaded Back Stitch is generally associated with bead embroidery.  However, this stitch is applicable in creating a base row for brick stitch.  It is created by stringing the first row of beads, then stitching back through each bead so they align side by side with the holes of the beads on the outside rather than facing each other (like they would when simply strung together).  This beading technique can be done with just about any type and size of seed bead.  However, disk beads, beads with multiple holes, and triangular beads are not recommended with this stitch.  Tube shaped beads, annular shaped beads (like Miyuki Delicas), barrel beads, cylinder shaped beads, crow beads, pony beads, and cube beads work well with the back stitch.

Support this blog and buy me a coffee at 


You can watch the following video or scroll down to see the individual slides of how to create a single needle ladder stitch base row for brick stitch beading with the single bead technique.

Watch the tutorial video:

You can view this video tutorial on YouTube here:

View the individual steps:

Click the image to view the beaded back stitch beading tutorial image larger.
The Double Needle Ladder Stitch Single Bead technique tutorial is part of an educational video series on brick stitch beading techniques.  Scroll down to view each step.  Click on the images to view them larger.

Step 1:  Thread a stop bead on the end of your thread.  Be sure to leave at least a 6 inch tail of thread to later tie off your end.
Click the image to view the beaded back stitch beading tutorial image larger.

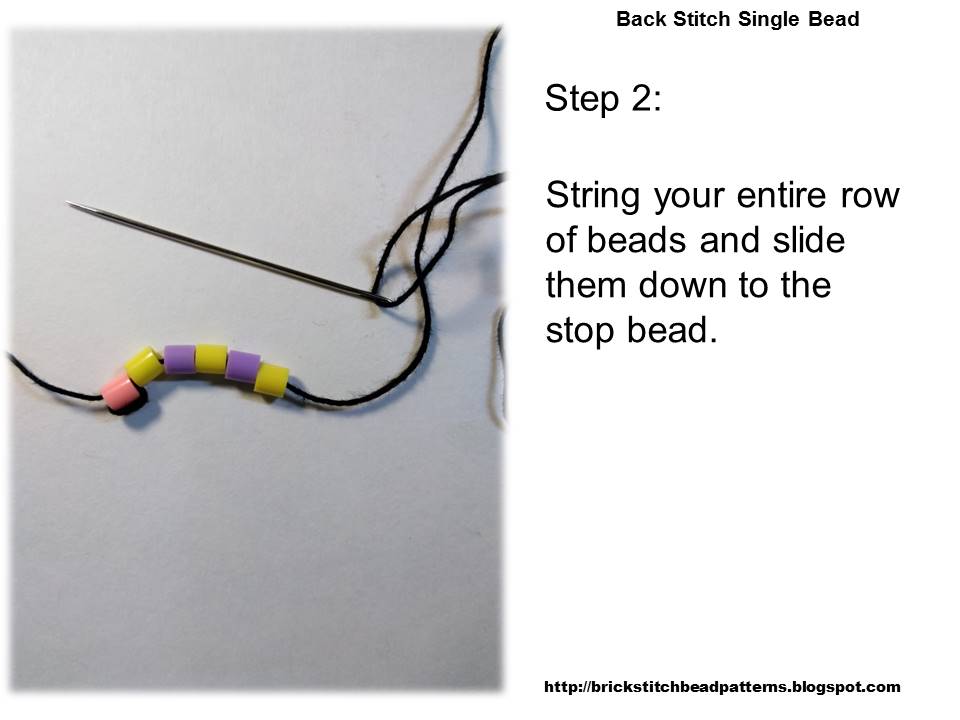
Step 2:  String your entire row of beads and slide them down to the stop bead.
Click the image to view the beaded back stitch beading tutorial image larger.

Step 3:  Thread the needle through the back of the second to last bead.
Click the image to view the beaded back stitch beading tutorial image larger.

Step 4:  Pull the thread so the last two beads align side by side.  Keep the thread loose, but no so loose that the beadwork looses its' shape.
Click the image to view the beaded back stitch beading tutorial image larger.

Step 5:  Thread the needle from the back of the next bead and pull the thread so that the bead aligns side by side with the last bead.
Click the image to view the beaded back stitch beading tutorial image larger.

Step 6:  Thread the needle from the back of the next bead and pull the thread so that the bead aligns side by side with the last bead.
Click the image to view the beaded back stitch beading tutorial image larger.

Step 7:  Thread the needle from the back of the next bead and pull the thread so that the bead aligns side by side with the last bead.
Click the image to view the beaded back stitch beading tutorial image larger.

Step 8:  Check that all of the beads are aligned.  If not, pull the threads a little tighter.  Otherwise, you are ready to begin your brick stitch row.
Click the image to view the beaded back stitch beading tutorial image larger.

Double Needle Ladder Stitch 3 Drop Bead Technique Tutorial

Base Row Technique For Brick Stitch Beading


Brick stitch must have a foundation to build from.  There are several ways to create a base row, also known as a foundation row, with beads.  In this tutorial, you will see how to create a Double Needle Ladder Stitch with a 3 drop bead technique to create the first row of your bead pattern.  This is a very easy beading stitch to learn and use.  It is created by sewing beads together so they align side by side with the holes of the beads on the outside rather than facing each other (like they would when simply strung together).  The Double Needle Ladder Stitch is a very useful base row for patterns where the base row is in the center of the piece.  By using the Double Needle Ladder Stitch, you can have double the length of thread, using half for beading the top of the piece and the other half for beading the bottom of the piece.  This stitch can be used to bead bracelet and necklace chains as well, rather than just stringing the beads.  There is more thread support in the ladder stitch than there is in strung beads.  This beading technique can be done with just about any type and size of bead.  However, disk beads, beads with multiple holes, and triangular beads are very challenging bead shapes to ladder stitch.  Tube shaped beads, annular shaped beads (like Miyuki Delicas), barrel beads, cylinder shaped beads, crow beads, and cube beads work well with the ladder stitch.

Support this blog and buy me a coffee at 

You can watch the following video or scroll down to see the individual slides of how to create a single needle ladder stitch base row for brick stitch beading with the single bead technique.

Watch the tutorial video:

You can view this video tutorial on YouTube here:

View the individual steps:

Click the image to view the double needle ladder stitch beading tutorial image larger.
Double Needle Ladder Stitch 3 Drop Bead Tutorial
The Double Needle Ladder Stitch Single Bead technique tutorial is part of an educational video series on brick stitch beading techniques.  Scroll down to view each step.  Click on the images to view them larger.

Step 1:  Thread a needle at each end of your thread and string the first two bead stacks (6 beads) of your base row with the first needle.
Click the image to view the double needle ladder stitch beading tutorial image larger.
Double Needle Ladder Stitch 3 Drop Bead Tutorial Step 1

Step 2:  Slide the beads to the center of your thread and thread the second needle through the second three bead stack, in the opposite direction of the first needle and pull the thread taught.
Click the image to view the double needle ladder stitch beading tutorial image larger.
Double Needle Ladder Stitch 3 Drop Bead Tutorial Step 2

Step 3:  String the next bead stack of your base row with the first needle and slide the three beads down to the other bead stacks.
Click the image to view the double needle ladder stitch beading tutorial image larger.
Double Needle Ladder Stitch 3 Drop Bead Tutorial Step 3

Step 4:  Thread the second needle through the three bead stack you just added in the opposite direction.  Pull the thread taught.
Click the image to view the double needle ladder stitch beading tutorial image larger.
Double Needle Ladder Stitch 3 Drop Bead Tutorial Step 4

Step 5:  String the next three bead stack of your base row with the first needle and slide it down to the other bead stacks.
Click the image to view the double needle ladder stitch beading tutorial image larger.
Double Needle Ladder Stitch 3 Drop Bead Tutorial Step 5

Step 6:  Thread the second needle through the bead stack you just added in the opposite direction.  Pull the thread taught.
Click the image to view the double needle ladder stitch beading tutorial image larger.
Double Needle Ladder Stitch 3 Drop Bead Tutorial Step 6

Step 7:  String the next three bead stack of your base row with the first needle and slide it down with the other bead stacks.
Click the image to view the double needle ladder stitch beading tutorial image larger.
Double Needle Ladder Stitch 3 Drop Bead Tutorial Step 7

Step 8:  Thread the second needle through the bead stack you just added in the opposite direction.  Pull the thread taught.
Click the image to view the double needle ladder stitch beading tutorial image larger.
Double Needle Ladder Stitch 3 Drop Bead Tutorial Step 8

Step 9:  If you have more beads to add to your base row, repeat from step #7.
Click the image to view the double needle ladder stitch beading tutorial image larger.
Double Needle Ladder Stitch 3 Drop Bead Tutorial Step 9

Ladder Stitch Beading Tips:
-If you feel the beads are too loose and wish to further reinforce the ladder stitch, simply pass the needle and thread back through the row, down one bead, up the next bead until you are back at the beginning of the row.  After doing this, the beads will be closer together and more straight; the threading will be much tighter and stronger.

-You can create small beaded beads and beaded links with the ladder stitch by joining the ends of your row together as a component to a larger beaded piece, like a necklace or bracelet.  Starting with step 12, thread the needle down through the first bead of the ladder stitch row.  Then, thread the needle up through the last bead of the to join the ends.  Repeat this again to reinforce the join.  Now you have made a ladder stitch loop that can be used as a bead or a chain link.

-The ladder stitch is used to make the popular beaded wrap bracelets that are sold in most trendy mall stores.


Follow Brick Stitch Bead Patterns Journal on Social Media:


Instagram:  https://www.instagram.com/brickstitchbeadpatterns/ (@brickstitchbeadpatterns)

Double Needle Ladder Stitch 2 Drop Bead Technique Tutorial

Base Row Technique For Brick Stitch Beading


Brick stitch must have a foundation to build from.  There are several ways to create a base row, also known as a foundation row, with beads.  In this tutorial, you will see how to create a Double Needle Ladder Stitch with a 2 drop bead technique to create the first row of your bead pattern.  This is a very easy beading stitch to learn and use.  It is created by sewing beads together so they align side by side with the holes of the beads on the outside rather than facing each other (like they would when simply strung together).  The Double Needle Ladder Stitch is a very useful base row for patterns where the base row is in the center of the piece.  By using the Double Needle Ladder Stitch, you can have double the length of thread, using half for beading the top of the piece and the other half for beading the bottom of the piece.  This stitch can be used to bead bracelet and necklace chains as well, rather than just stringing the beads.  There is more thread support in the ladder stitch than there is in strung beads.  This beading technique can be done with just about any type and size of bead.  However, disk beads, beads with multiple holes, and triangular beads are very challenging bead shapes to ladder stitch.  Tube shaped beads, annular shaped beads (like Miyuki Delicas), barrel beads, cylinder shaped beads, crow beads, and cube beads work well with the ladder stitch.

Support this blog and buy me a coffee at 


You can watch the following video or scroll down to see the individual slides of how to create a single needle ladder stitch base row for brick stitch beading with the single bead technique.

Watch the tutorial video:


You can view this video tutorial on YouTube here:

View the individual steps:


Click the image to view the double needle ladder stitch beading tutorial image larger.
Double Needle Ladder Stitch 2 Drop Bead Tutorial
The Double Needle Ladder Stitch Single Bead technique tutorial is part of an educational video series on brick stitch beading techniques.  Scroll down to view each step.  Click on the images to view them larger.

Step 1:  Thread a needle at each end of your thread and string the first two bead stacks (4 beads) of your base row with the first needle.
Click the image to view the double needle ladder stitch beading tutorial image larger.
Double Needle Ladder Stitch 2 Drop Bead Tutorial Step 1

Step 2:  Slide the beads to the center of your thread and thread the second needle through the second two bead stack, in the opposite direction of the first needle and pull the thread taught.
Click the image to view the double needle ladder stitch beading tutorial image larger.
Double Needle Ladder Stitch 2 Drop Bead Tutorial Step 2

Step 3:  String the next bead stack of your base row with the first needle and slide the two beads down to the other bead stacks.
Click the image to view the double needle ladder stitch beading tutorial image larger.
Double Needle Ladder Stitch 2 Drop Bead Tutorial Step 3

Step 4:  Thread the second needle through the two bead stack you just added in the opposite direction.  Pull the thread taught.
Click the image to view the double needle ladder stitch beading tutorial image larger.
Double Needle Ladder Stitch 2 Drop Bead Tutorial Step 4

Step 5:  String the next two bead stack of your base row with the first needle and slide it down to the other bead stacks.
Click the image to view the double needle ladder stitch beading tutorial image larger.
Double Needle Ladder Stitch 2 Drop Bead Tutorial Step 5

Step 6:  Thread the second needle through the bead stack you just added in the opposite direction.  Pull the thread taught.
Click the image to view the double needle ladder stitch beading tutorial image larger.
Double Needle Ladder Stitch 2 Drop Bead Tutorial Step 6

Step 7:  String the next two bead stack of your base row with the first needle and slide it down with the other bead stacks.
Click the image to view the double needle ladder stitch beading tutorial image larger.
Double Needle Ladder Stitch 2 Drop Bead Tutorial Step 7

Step 8:  Thread the second needle through the bead stack you just added in the opposite direction.  Pull the thread taught.
Click the image to view the double needle ladder stitch beading tutorial image larger.
Double Needle Ladder Stitch 2 Drop Bead Tutorial Step 8

Step 9:  If you have more beads to add to your base row, repeat from step #7.
Click the image to view the double needle ladder stitch beading tutorial image larger.
Double Needle Ladder Stitch 2 Drop Bead Tutorial Step 9

Ladder Stitch Beading Tips:
-If you feel the beads are too loose and wish to further reinforce the ladder stitch, simply pass the needle and thread back through the row, down one bead, up the next bead until you are back at the beginning of the row.  After doing this, the beads will be closer together and more straight; the threading will be much tighter and stronger.

-You can create small beaded beads and beaded links with the ladder stitch by joining the ends of your row together as a component to a larger beaded piece, like a necklace or bracelet.  Starting with step 12, thread the needle down through the first bead of the ladder stitch row.  Then, thread the needle up through the last bead of the to join the ends.  Repeat this again to reinforce the join.  Now you have made a ladder stitch loop that can be used as a bead or a chain link.

-The ladder stitch is used to make the popular beaded wrap bracelets that are sold in most trendy mall stores.


Follow Brick Stitch Bead Patterns Journal on Social Media:


Instagram:  https://www.instagram.com/brickstitchbeadpatterns/ (@brickstitchbeadpatterns)


Double Needle Ladder Stitch Single Bead Technique

Base Row Technique For Brick Stitch Beading


Brick stitch must have a foundation to build from.  There are several ways to create a base row, also known as a foundation row, with beads.  In this tutorial, you will see how to create a Double Needle Ladder Stitch with a single bead technique to create the first row of your bead pattern.  This is a very easy beading stitch to learn and use.  It is created by sewing beads together so they align side by side with the holes of the beads on the outside rather than facing each other (like they would when simply strung together).  The Double Needle Ladder Stitch is a very useful base row for patterns where the base row is in the center of the piece.  By using the Double Needle Ladder Stitch, you can have double the length of thread, using half for beading the top of the piece and the other half for beading the bottom of the piece.  This stitch can be used to bead bracelet and necklace chains as well, rather than just stringing the beads.  There is more thread support in the ladder stitch than there is in strung beads.  This beading technique can be done with just about any type and size of bead.  However, disk beads, beads with multiple holes, and triangular beads are very challenging bead shapes to ladder stitch.  Tube shaped beads, annular shaped beads (like Miyuki Delicas), barrel beads, cylinder shaped beads, crow beads, and cube beads work well with the ladder stitch.

Support this blog and buy me a coffee at 

You can watch the following video or scroll down to see the individual slides of how to create a single needle ladder stitch base row for brick stitch beading with the single bead technique.

Watch the tutorial video:


You can view this video tutorial on YouTube here:

View the individual steps:

Click the image to view the double needle ladder stitch beading tutorial image larger.
The Double Needle Ladder Stitch Single Bead technique tutorial is part of an educational video series on brick stitch beading techniques.  Scroll down to view each step.  Click on the images to view them larger.

Step 1:  Thread a needle at each end of your thread and string the first two beads of your base row with the first needle.
Click the image to view the double needle ladder stitch beading tutorial image larger.

Step 2:  Slide the beads to the center of your thread and thread the second needle through the second bead, back through in the opposite direction of the first needle and pull the thread taught.
Click the image to view the double needle ladder stitch beading tutorial image larger.

Step 3:  String the next bead of your base row with the first needle and slide it down to the other beads.
Click the image to view the double needle ladder stitch beading tutorial image larger.

Step 4:  Thread the second needle through the bead you just added in the opposite direction.  Pull the thread taught.
Click the image to view the double needle ladder stitch beading tutorial image larger.

Step 5:  String the next bead of your base row with the first needle and slide it down to the other beads.
Click the image to view the double needle ladder stitch beading tutorial image larger.

Step 6:  Thread the second needle through the bead you just added in the opposite direction.  Pull the thread taught.
Click the image to view the double needle ladder stitch beading tutorial image larger.

Step 7:  String the next bead of your base row with the first needle and slide it down with the other beads.
Click the image to view the double needle ladder stitch beading tutorial image larger.

Step 8:  Thread the second needle through the bead you just added in the opposite direction.  Pull the thread taught.
Click the image to view the double needle ladder stitch beading tutorial image larger.

Step 9:  If you have more beads to add to your base row, repeat from step #7.
Click the image to view the double needle ladder stitch beading tutorial image larger.

Ladder Stitch Beading Tips:
-If you feel the beads are too loose and wish to further reinforce the ladder stitch, simply pass the needle and thread back through the row, down one bead, up the next bead until you are back at the beginning of the row.  After doing this, the beads will be closer together and more straight; the threading will be much tighter and stronger.

-You can create small beaded beads and beaded links with the ladder stitch by joining the ends of your row together as a component to a larger beaded piece, like a necklace or bracelet.  Starting with step 12, thread the needle down through the first bead of the ladder stitch row.  Then, thread the needle up through the last bead of the to join the ends.  Repeat this again to reinforce the join.  Now you have made a ladder stitch loop that can be used as a bead or a chain link.

-The ladder stitch is used to make the popular beaded wrap bracelets that are sold in most trendy mall stores.


Follow Brick Stitch Bead Patterns Journal on Social Media:


Instagram:  https://www.instagram.com/brickstitchbeadpatterns/ (@brickstitchbeadpatterns)


Single Needle Ladder Stitch 3 Drop Bead Technique

Base Row Technique For Brick Stitch Beading

Brick stitch must have a foundation to build from.  There are several ways to create a base row, also known as a foundation row, with beads.  In this tutorial, you will see how to create a Single Needle Ladder Stitch with a 3 Drop bead technique to create the first row of your bead pattern.  This is a very easy beading stitch to learn and use.  It is created by sewing beads together so they align side by side with the holes of the beads on the outside rather than facing each other (like they would when simply strung together).  The Single Needle Ladder Stitch is the most commonly used beading technique to create a base row for brick stitch beading, as well as for the herringbone stitch and several other popular beading stitches.  The Single Needle Ladder Stitch is also the most common stitch used to increase rows in brick stitch at the beginning and ending of rows.  This stitch can be used to bead bracelet and necklace chains as well, rather than just stringing the beads.  There is more thread support in the ladder stitch than there is in strung beads.  This beading technique can be done with just about any type and size of bead.  However, disk beads, beads with multiple holes, and triangular beads are very challenging bead shapes to ladder stitch.  Tube shaped beads, annular shaped beads (like Miyuki Delicas), barrel beads, cylinder shaped beads, crow beads, and cube beads work well with the ladder stitch.

Support this blog and buy me a coffee at 


You can watch the following video or scroll down to see the individual slides of how to create a single needle ladder stitch base row for brick stitch beading with the single bead technique.

Watch the tutorial video:


You can view this video tutorial on YouTube here:

View the individual steps:


Click the image to view the single needle ladder stitch beading tutorial image larger.
Single Needle Ladder Stitch 3 Drop Bead Tutorial
The Single Needle Ladder Stitch Single Bead technique tutorial is part of an educational video series on brick stitch beading techniques.  Scroll down to view each step.  Click on the images to view them larger.

Step 1:  String the first two three-bead-stacks (6 beads) of your base row.
Click the image to view the single needle ladder stitch beading tutorial step 1 image larger.
Single Needle Ladder Stitch 3 Drop Bead Tutorial Step 1

Step 2:  Tie a square knot and pull tight enough that the bead stacks align side by side.
Click the image to view the single needle ladder stitch beading tutorial step 2 image larger.
Single Needle Ladder Stitch 3 Drop Bead Tutorial Step 2

Step 3:  Thread the needle up through the first three bead stack and pull the thread taught.
Click the image to view the single needle ladder stitch beading tutorial step 3 image larger.
Single Needle Ladder Stitch 3 Drop Bead Tutorial Step 3

Step 4:  Thread the needle down through the second three bead stack and pull the thread taught.
Click the image to view the single needle ladder stitch beading tutorial step 4 image larger.
Single Needle Ladder Stitch 3 Drop Bead Tutorial Step 4

Step 5:  String the next three bead stack of your base row.
Click the image to view the single needle ladder stitch beading tutorial step 5 image larger.
Single Needle Ladder Stitch 3 Drop Bead Tutorial Step 5

Step 6:  Thread the needle down through the last three bead stack and pull the thread taught.
Click the image to view the single needle ladder stitch beading tutorial step 6 image larger.
Single Needle Ladder Stitch 3 Drop Bead Tutorial Step 6

Step 7:  Thread the needle up through the three bead stack just added and pull the thread taught.
Click the image to view the single needle ladder stitch beading tutorial step 7 image larger.
Single Needle Ladder Stitch 3 Drop Bead Tutorial Step 7

Step 8:  String the next three bead stack.
Click the image to view the single needle ladder stitch beading tutorial step 8 image larger.
Single Needle Ladder Stitch 3 Drop Bead Tutorial Step 8

Step 9:  Thread the needle up through the bead stack before and pull the thread taught.
Click the image to view the single needle ladder stitch beading tutorial step 9 image larger.
Single Needle Ladder Stitch 3 Drop Bead Tutorial Step 9

Step 10:  Thread the needle down through the three bead stack just added and pull the thread taught.
Click the image to view the single needle ladder stitch beading tutorial step 10 image larger.
Single Needle Ladder Stitch 3 Drop Bead Tutorial Step 10

Step 11:  String the next three bead stack of your base row.
Click the image to view the single needle ladder stitch beading tutorial step 11 image larger.
Single Needle Ladder Stitch 3 Drop Bead Tutorial Step 11

Step 12:  Thread the needle down through the previous three bead stack and pull the thread taught.
Click the image to view the single needle ladder stitch beading tutorial step 12 image larger.
Single Needle Ladder Stitch 3 Drop Bead Tutorial Step 12

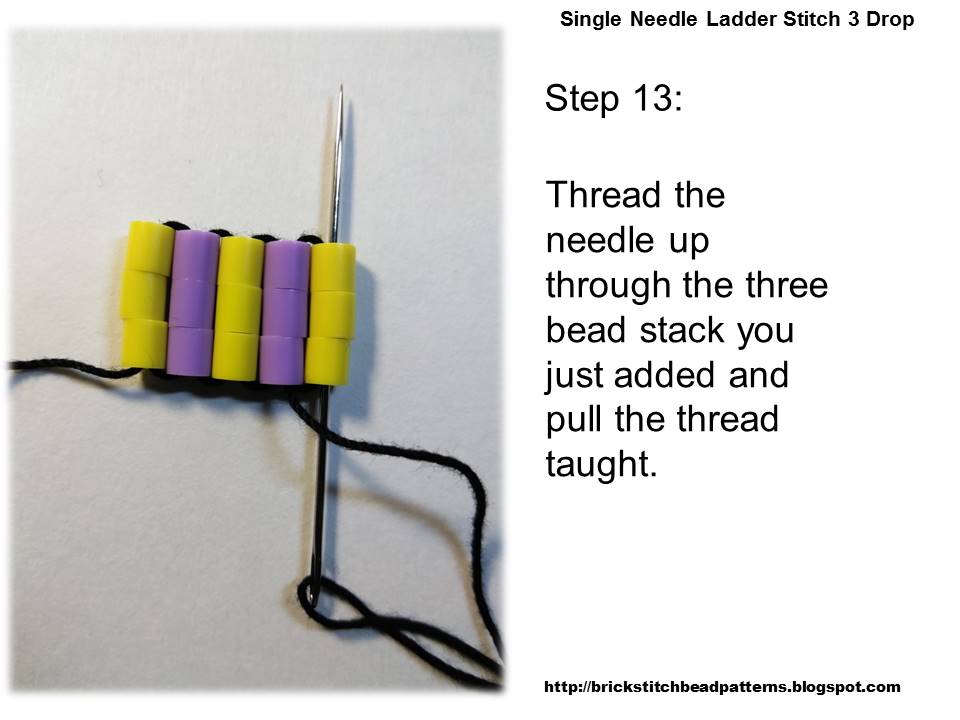
Step 13:  Thread the needle up through the three bead stack you just added and pull the thread taught.
Click the image to view the single needle ladder stitch beading tutorial step 13 image larger.
Single Needle Ladder Stitch 3 Drop Bead Tutorial Step 13

Step 14:  If you have more bead stacks to add to your row, repeat from step #8.
Click the image to view the single needle ladder stitch beading tutorial step 14 image larger.
Single Needle Ladder Stitch 3 Drop Bead Tutorial Step 14

Ladder Stitch Beading Tips:

-If you feel the beads are too loose and wish to further reinforce the ladder stitch, simply pass the needle and thread back through the row, down one bead, up the next bead until you are back at the beginning of the row.  After doing this, the beads will be closer together and more straight; the threading will be much tighter and stronger.

-You can create small beaded beads and beaded links with the ladder stitch by joining the ends of your row together as a component to a larger beaded piece, like a necklace or bracelet.  Starting with step 12, thread the needle down through the first bead of the ladder stitch row.  Then, thread the needle up through the last bead of the to join the ends.  Repeat this again to reinforce the join.  Now you have made a ladder stitch loop that can be used as a bead or a chain link.

-The ladder stitch is used to make the popular beaded wrap bracelets that are sold in most trendy mall stores.


Follow Brick Stitch Bead Patterns Journal on Social Media:
Instagram:  https://www.instagram.com/brickstitchbeadpatterns/ (@brickstitchbeadpatterns)

Popular Posts